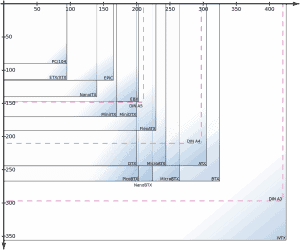
Last time, we talked about your goals and constraints. Now that you’ve recognized and documented your goals, there are a few more rules that come into play. Just like the ratios of ingredients going into a cake, Form Factors are an essential part of fitting your build together. These new constraints will add the next level to your current mental picture of your setup, often making it better than before. Don’t be afraid of making changes, we’re still far from done in our series!
Form Factors
An important topic, the “Form Factors” of the machine are the constraints you use to make sure everything is a uniform scale. This will determine by-and-large what will squeeze into your case and slot into your motherboard. Form factors have gone through a big evolution. There used to be several types, made by several different companies. Currently, the two main subcategories are ATX and ITX.
ATX is the most common of the form factors. It’s a full-size setup, built for housing larger components such as third-party cooling systems and beefy graphics cards. From there, we go into Mini ATX and then Micro ATX. ITX has no “large” or even “medium” size; they start with Mini ITX. There are also Micro ITX, and the incredibly small Pico ITX, both with their own unique motherboards and size constraints. You can usually find one motherboard in all these formats that’ll fit your chip, but it’s worth considering what you’re using the machine for. One of the major differences in form factors is the number of Ram sticks you can fit in.
ATX and Micro ATX will support up to 4 ram sticks, while Mini ITX can only support 2. Another consideration is the number and size of the cards you’ll be plugging into the PCI slots. Will just a nice Video Card and an expanded network card do the trick? Or just the video with some extra USB3s in the back? If you only need 1 or 2 cards, something a little smaller than an ATX would be just fine for you. It never hurts to look forward and plan, but your wallet may see the difference.

Different Sockets
There are many different types of sockets; this is the basic compatibility between your CPU and your motherboard. Sockets can be broadly generalized into two different categories: LGA and PGA, which are Intel and AMD, respectively. Both make a connection by pressing extremely small plates to pins. LGA (Land Grid Array) is a smooth chip that is set on top of pins. PGA (Pin Grid Array) is a chip full of pins that slide into individual holes on the motherboard.
It goes further than this, though. Both LGA and PGA have many different sub-models. Finding the right CPU/Motherboard compatibility is the first step in your journey to setting up your new machine with correct form factors. For this reason, it’s important to check compatibility on the specs of your motherboard and your CPU before buying either.
DDR2/3/4
Different types of ram as well as different amounts can have an impact on your system’s performance. I’ll first let you know that DDR2 is nearly extinct and you most likely won’t be dealing with that, but it’s worth mentioning in case you’re considering purchasing used parts on Craigslist or Facebook Marketplace. As far as the difference between DDR3 and DDR4, you won’t see much performance-wise, but you won’t be able to run DDR3 on a DDR4 motherboard, and vice versa. They may look the same, but the small notch in the pins will prevent you from mixing up the two.
Ram also commonly has a Megahertz rating included in its specs. This is called DIMM speed. This will only go as high as the lowest speed limits between your CPU and Motherboard. For example, if you have a CPU rated at 1866 and a motherboard rated at 1600, the max you should get on your ram should be 1600. You can get something larger and it’ll work, but there’s no purpose as your computer won’t be able to utilize the extra headroom your overpowered ram will bring. A situation where one part of the computer is restricting the rest of it from performing at its max potential is called “Bottle-necking.” Keep this concept in mind as you search for your new pair of ram sticks.
SATA Cables
Making sure you’ve got the right SATA cables is the next step to ensuring your HDD/SSD can make a firm connection to your computer, and at what speeds. SATA specs can often be found on the motherboard, as they have their own individual plugs. You likely won’t need to worry so much about the number of ports per-se, as what version of SATA your Motherboard supports. SATA 1 transfers at 1.5Gb/s, where SATA 2 doubles that to 3Gb/s, and SATA 3 doubles SATA 2’s speeds, reaching 6gb/s. Many new motherboards come equipped with SATA 3, but that doesn’t mean all of them are. It doesn’t so much rely on form factors, but it’s worth looking at before starting your build. This will help determine things like boot speed and the specific connection cables.
CPU Cooling
Fitting a cooling system into your form factor is integral to your build, to make sure the CPU doesn’t damage your other equipment and stays within optimal operating temperature. This is something to consider, especially if your processor doesn’t come with a stock fan, or you’ve elected to overclock your CPU. Sometimes, computer cases just won’t fit that giant array of aluminum fins or the mass of tubes that cools your CPU.
It’s worth checking the dimensions and Form Factor on your case and buying an appropriate sized cooler, just like pairing your motherboard and your CPU, which we’ll get to next.
